01
About Libria
Libria is a photo library app that registers folders on your Mac and lets you browse and search the photos in them. You can keep using your existing folder structure instead of moving photos into a separate Libria library.
Libria does not modify your original photos. Thumbnails, previews, standard search data, and AI search data are created locally on your Mac.
Libria Connect securely displays the same Libria library on an iPhone connected to the same local network. It does not upload the library to a separate cloud service.
02
What’s New in Build 9
Build 9 keeps the secure LAN connection introduced in Build 8 / Build 3 while making Mac library work easier to stop and rebuild, and protecting library data during folder changes.
Stop Scans Safely
You can stop a full rescan or change update in progress. Work completed before the stop is saved safely.
Rebuild Library Data
Keep registered folders and originals while rebuilding search, AI, face-analysis data, thumbnails, and caches.
Protected Folder Changes
When registering, removing, or relocating folders while work is active, Libria updates its registration data safely.
Clearer Original Availability
If an external drive or NAS is disconnected and an original is unavailable, Libria shows guidance to check the connection.
More Accurate AI Search Counts
The count of photos available to AI Search is reported more accurately, including after restoration.
Build 8 / Build 3 LAN Features Continue
TLS protection, QR pairing, iPhone browsing, search, and original-photo saving remain available.
03
System Requirements and Storage
System requirements
- macOS 14.0 or later
- An Apple Silicon Mac
- Enough free storage for your photos and Libria’s local data
To use Libria Connect
- An iPhone running iOS 17.0 or later
- The Mac and iPhone connected to the same local network
- Libria running on the Mac with an active Trial or Full Unlock
Recommended free storage
Keep at least 8 GB of free storage available for installation and initial preparation. This is a conservative recommendation, not a guaranteed technical minimum.
As a reference, the app itself is about 0.9 GB. In one measured library of about 5,000 photos, thumbnails, previews, standard search data, and AI search data used about 3.7 GB. Actual usage varies with photo count, file formats, the proportion of RAW photos, and reprocessing.
04
Install and Launch Libria
Install from the Mac App Store
- Open Libria on the Mac App Store.
- Use the download control shown by the Mac App Store and follow its instructions.
- When installation is complete, open Libria from Launchpad or the Applications folder.
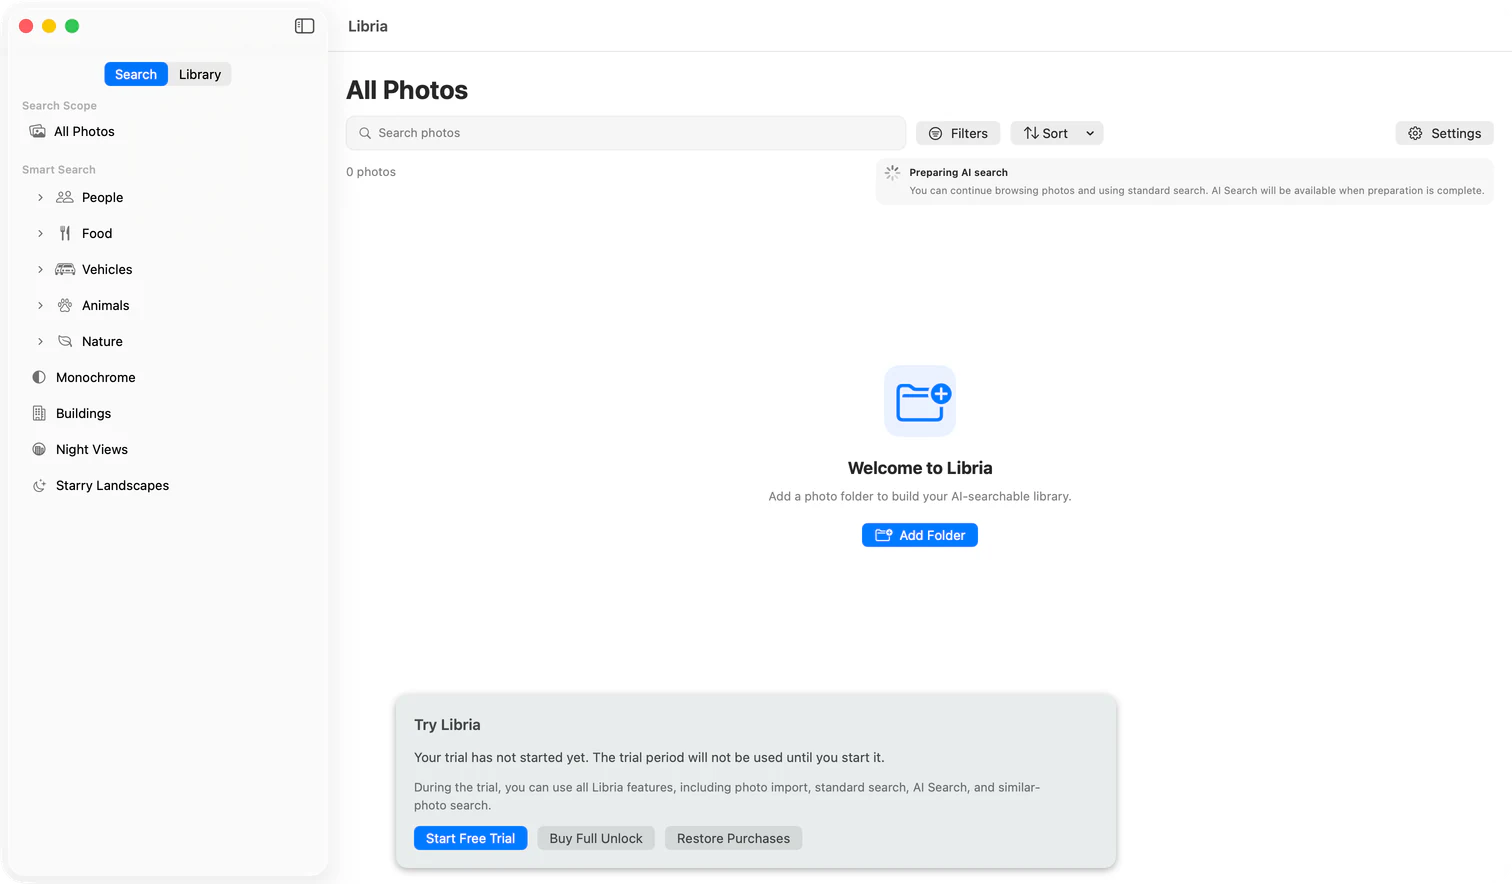
If no photo folder has been registered, the welcome screen shows:
- Heading: Welcome to Libria
- Message: Add a photo folder to build your AI-searchable library.
- Button: Add Folder
05
Start the Free Trial or Purchase Full Unlock
The initial screen shows Start Free Trial, Buy Full Unlock, and Restore Purchases. These labels are different from the controls on the Purchase Information screen.
Start the 14-day free trial
- Select Start Free Trial on the initial screen. To review all license options first, select Add Folder instead.
- If you selected Add Folder, the message This feature requires a Trial or Full Unlock. appears. Select Show Purchase Information.
- On the Purchase Information screen, review the trial terms and select Start 14-Day Trial. This screen also includes Purchase and Restore Purchases.
- If macOS displays a system prompt, review it and continue.
- Return to Libria and check the trial status.
You may be asked to sign in to Apple Media Services when starting the trial.
During the trial, you can register photos and use standard search, AI Search, Similar Photos, and other Libria features.
Purchase Full Unlock
- Select Buy Full Unlock on the initial screen. You can also select Add Folder → Show Purchase Information, or open Settings → About / Licenses → Purchase Information.
- Review the Full Unlock description and current price, then select Purchase.
- Follow the Mac App Store instructions to complete the purchase.
The Purchase Information screen includes the free trial, Full Unlock, and Restore Purchases.
06
Register Photo Folders and Rebuild Library Data
Add your first photo folder
Register a folder that contains your photos. Libria does not copy the photos to another location.
- Select Add Folder in the center of the welcome screen.
- If the license message appears, select Show Purchase Information and activate the Trial or Full Unlock. Selecting Later closes the message without adding a folder.
- After the license becomes active, select Add Folder again if the folder picker is not already open.
- Choose the folder that contains your photos.
- While Libria shows Registering folders…, wait for registration to finish.
- Confirm that the folder appears in the sidebar or under Settings → Photo Folders → Registered Folders.
- If the library shows No Photos and Scan your registered folders to show photos here., open Settings → Library & Search → Library Updates → Other Actions, then select Rescan All Folders.
macOS may ask for additional access to the selected folder. Whether this appears depends on your Mac settings and the folder location.
Rebuild data for an existing library
Use this when you need to rebuild local browsing and search data from the beginning, including for an existing library updated from Build 8. At least one photo folder must be registered, and the Trial or Full Unlock must be active.
- Open Settings → Library & Search.
- Open Other Actions in Library Updates.
- Select Rebuild Library Data….
- In the confirmation, review what remains and what will be cleared, then select Rebuild.
- Wait while Libria safely stops active scans and AI work, then rebuilds the library only from the folders that are currently registered.
07
Prepare Your Photo Library
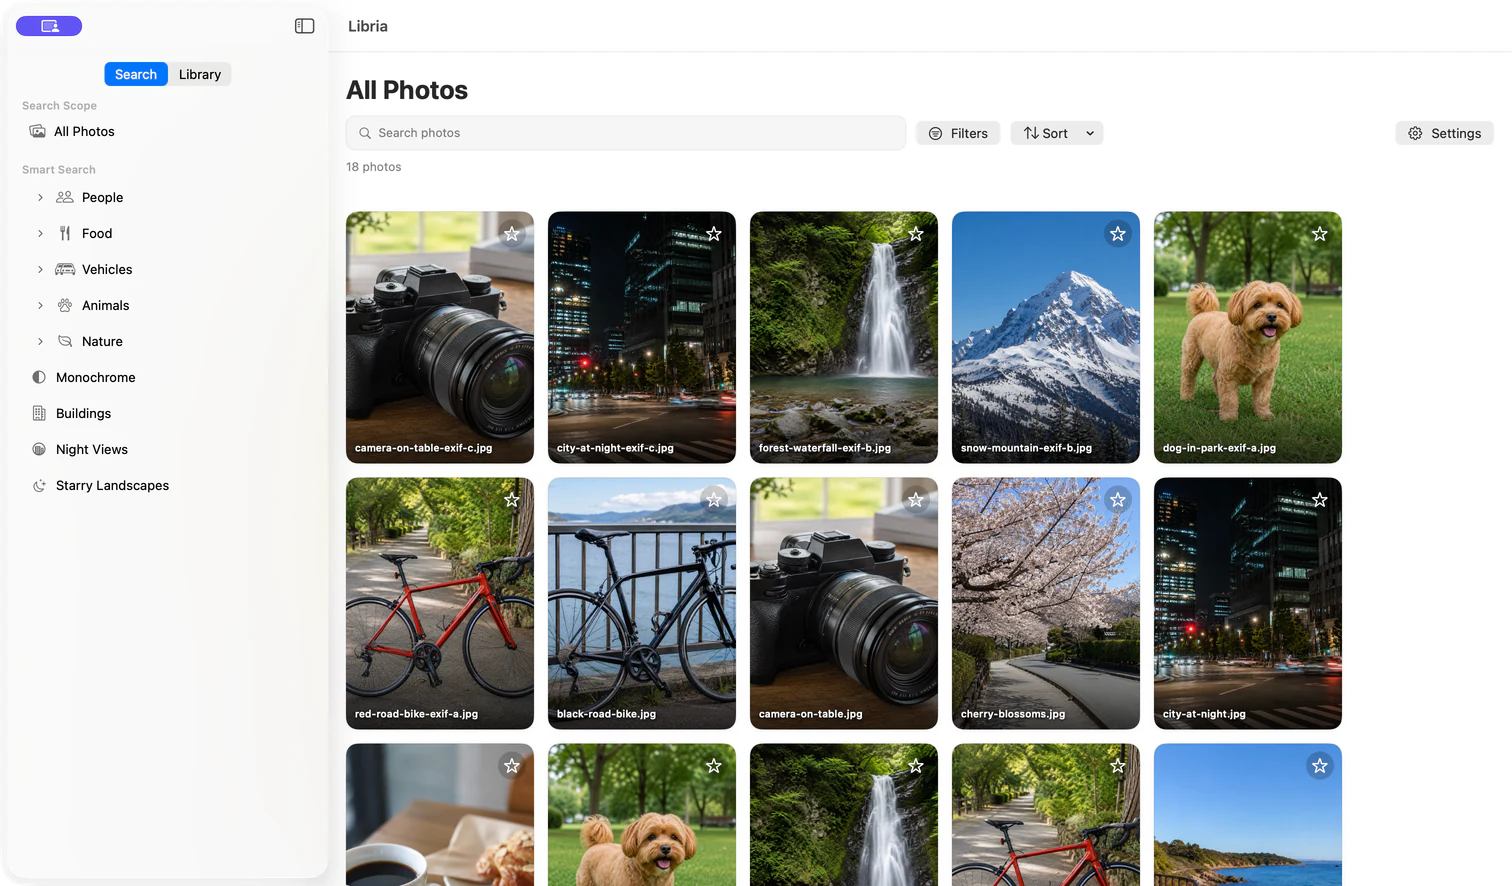
Scanning a registered folder creates the local data needed to display and search its photos.
Rescan when photos do not appear
- Open Settings.
- Select Library & Search.
- Open Other Actions under Library Updates.
- Select Rescan All Folders.
- When the rescan finishes, open All Photos and check the library.
Stop a scan in progress
- Check the progress in the sidebar or in Settings → Library & Search → Library Updates.
- Select Stop Scan. While the stop is being processed, the button reads Stopping Scan….
- When Libria shows Scan stopped, the stop is complete. Run Rescan All Folders or Update Detected Changes again when needed.
Work completed before the stop is saved safely. Your original photo files are not changed or deleted.
A prepared library shows Ready. Settings shows Library Status with the same ready state.
Apply photos added or changed later
- Open Settings → Library & Search.
- Select Check for Changes. This checks the folders without updating the library yet.
- If changes are found, choose Update Detected Changes from Other Actions.
08
Prepare the LAN Connection on Your Mac
Use Libria Connect on the same local network as the Mac running Libria. The Mac requires an active Trial or Full Unlock.
- Open Libria on the Mac, then open Settings → General.
- Under iOS LAN Connection, select Enable LAN Connection.
- Confirm that the status changes to Listening with TLS.
- Keep Libria running and prevent the Mac from sleeping while the iPhone is connected.
09
Pair Your iPhone
- Under iOS LAN Connection on the Mac, select Add New Device to display a pairing QR code.
- Open Libria Connect on the iPhone and select Scan QR Code.
- If asked for Camera and Local Network access, review the purpose and allow access.
- Keep the complete Mac QR code in the camera frame, then select Pair.
- Select Connect and confirm that the destination reports Libria 1.2, Build 9, and the expected photo count.
- Select Show Photos.
10
Browse Photos on iPhone
Photos normally appear in a three-column grid. Large accessibility text uses two columns, and more photos load as you scroll.
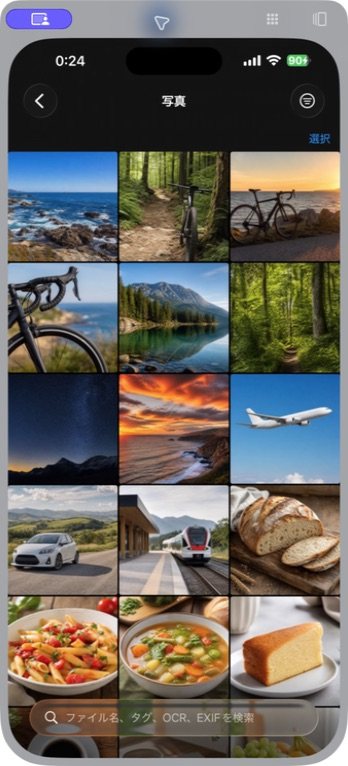
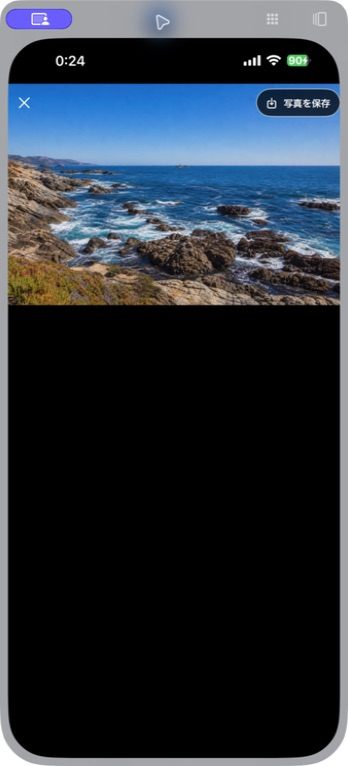
- Select a photo to open its high-resolution preview.
- Pinch to zoom and swipe left or right to move between photos.
- Close the preview to return to the same position in the grid.
11
Search and Filter on iPhone
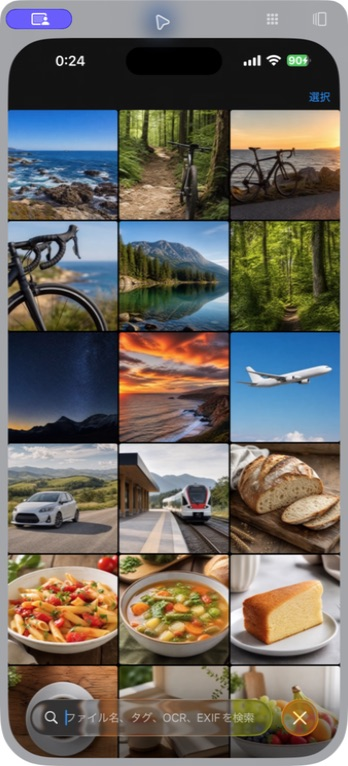
Use the field at the bottom to search filenames, tags, OCR text, EXIF, or visual content. The Mac chooses the search route automatically and can merge Smart, AI, or Hybrid results into the same grid when available.
- Select the search field and enter what you want to find.
- If AI Search is still being prepared or unavailable, review the notice that standard results are being shown.
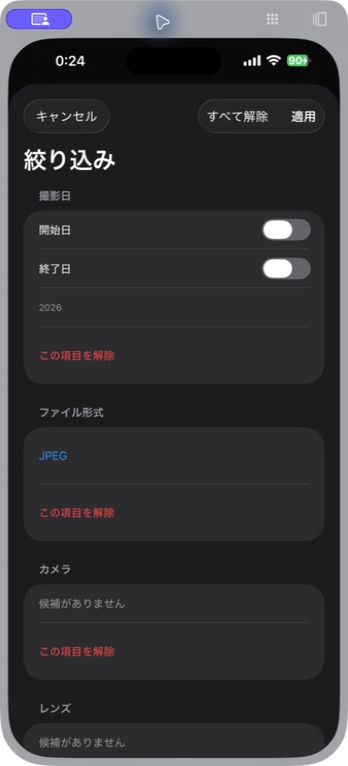
- To add structured conditions, select the filter button at the top right.
Filters include Date Taken, File Format, Camera, Lens, Focal Length, Aperture, and Shutter Speed. Select Apply, then remove one category with Clear this filter or reset everything with Clear All.
12
Save Originals to iPhone
Save one photo
Select Save Photo in the preview. If iOS asks for permission to add photos, review the purpose and allow the access required for saving.
Save multiple photos
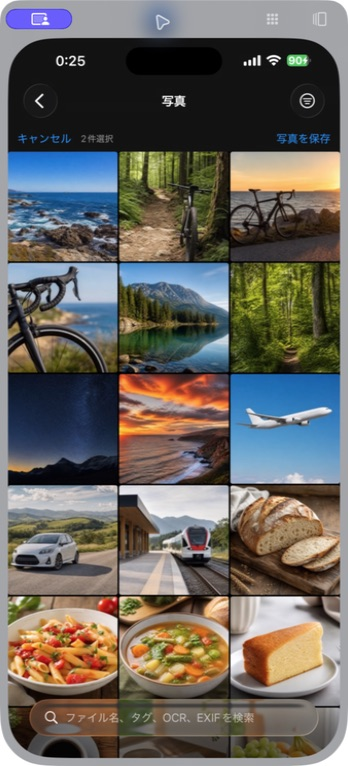
- Select Select in the photo grid.
- Select the photos to save and confirm the selected count.
- Select Save Photos and wait for the completion message.
13
Search Photos on Your Mac
- Select All Photos or a registered folder in the sidebar.
- Select the search field labeled Search photos.
- Enter what you want to find. While you type, the field shows Press Enter.
- Press Return. For example, entering “bike” creates the condition chip Search: bike.
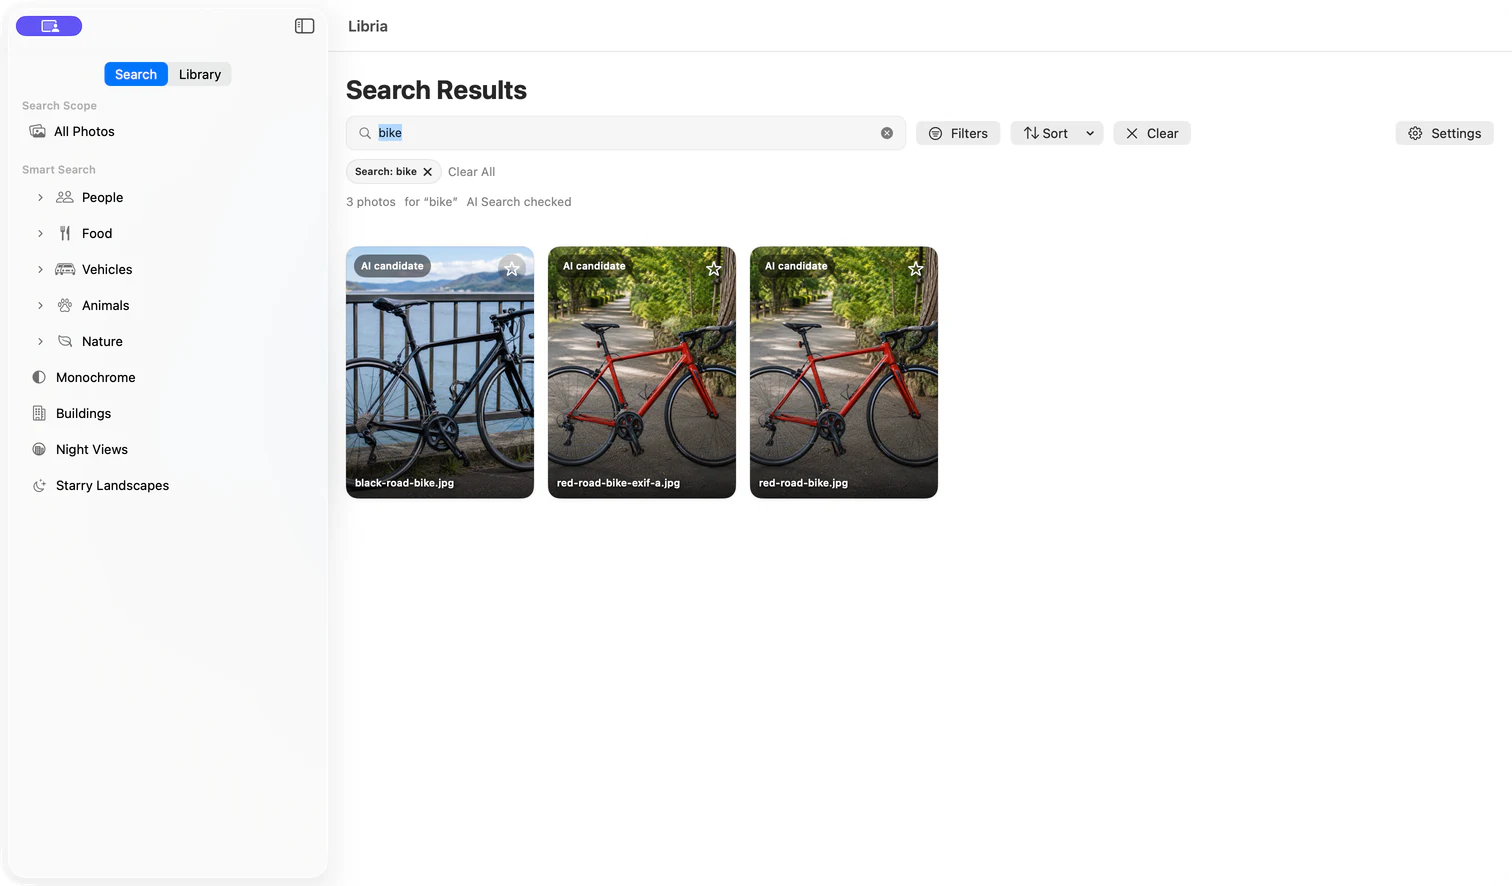
Use terms that describe the photo content, such as “dog” or “bicycle by the sea.” For camera, lens, and shooting details, select values from Filters instead of entering special syntax.
When AI Search is available, AI candidates may be included in these results. In the verified “bike” example, Libria showed three photos together with AI Search checked and AI candidate badges.
If nothing matches, Libria shows No search results, Try another term, a smart search, or different filters., and Clear Search.
14
Standard Search and AI Search
Standard Search
Uses information already registered for your photos. It remains available while AI Search is being prepared.
AI Search
Uses visual content to find candidates related to your search. AI candidates are merged into the same result grid.
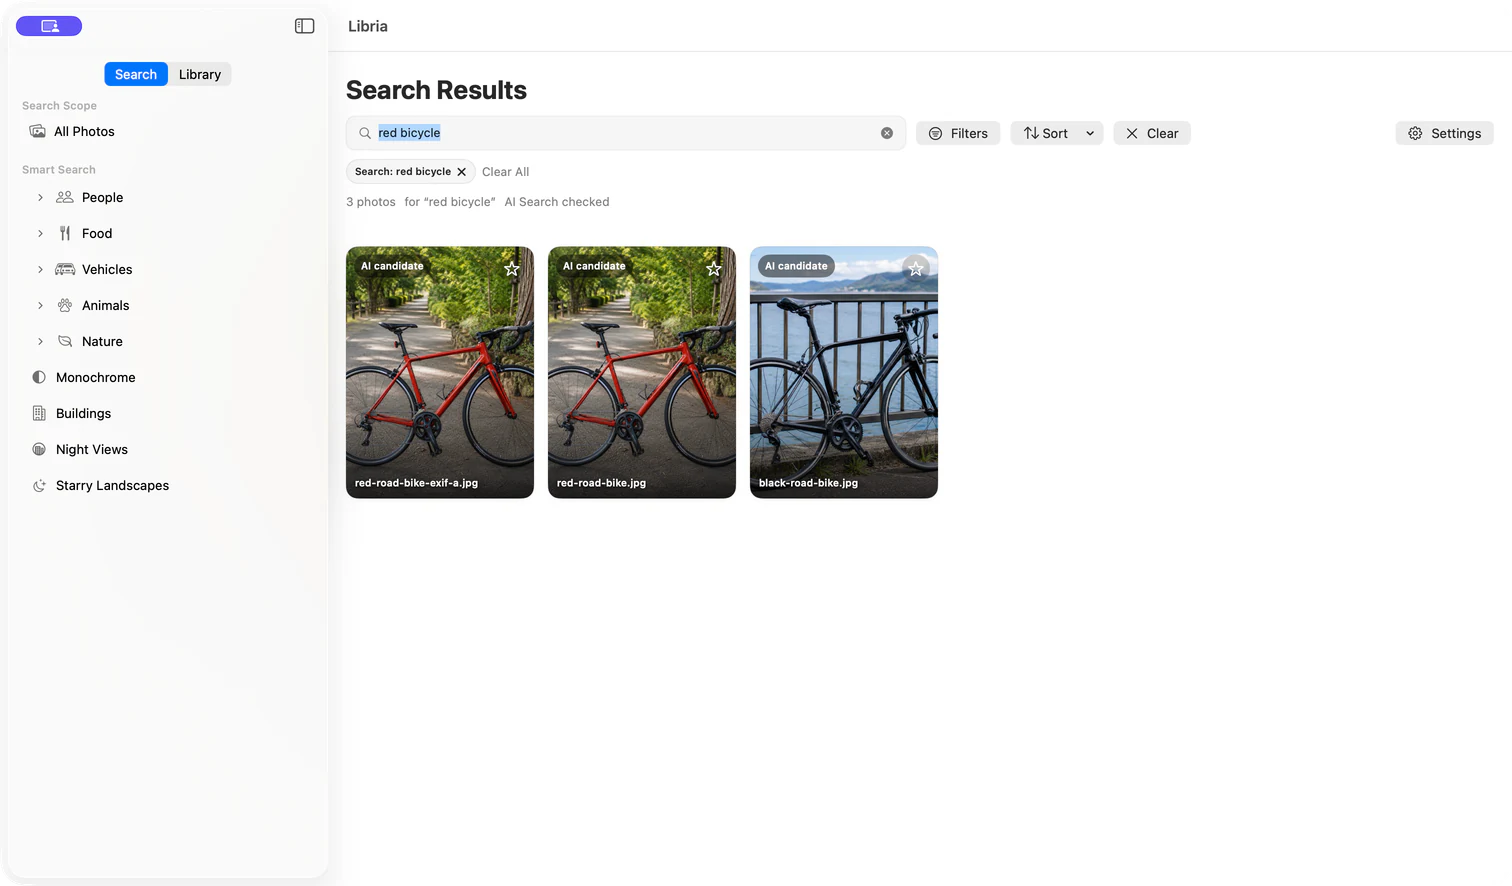
Both use the same Search photos field and the Return key. There is no separate AI Search start button or always-visible AI Search switch.
AI Search requires an active Trial or Full Unlock and prepared AI search data. When it is available, Libria may show AI Search checked and an AI candidate badge in the combined results.
15
Limit Search to Selected Folders
- Under Folders in the sidebar, select the registered folder you want to search.
- Enter a term in Search photos and press Return.
- Libria searches only photos in that folder.
Select All Photos to return to the whole library. You can also remove the Folder condition chip.
16
Filter by Camera, Lens, and Shooting Conditions
Open Filters to select:
- File Type
- Camera
- Lens
- F Number
- Focal Length
- Shutter Speed
- Year, Month, and Day
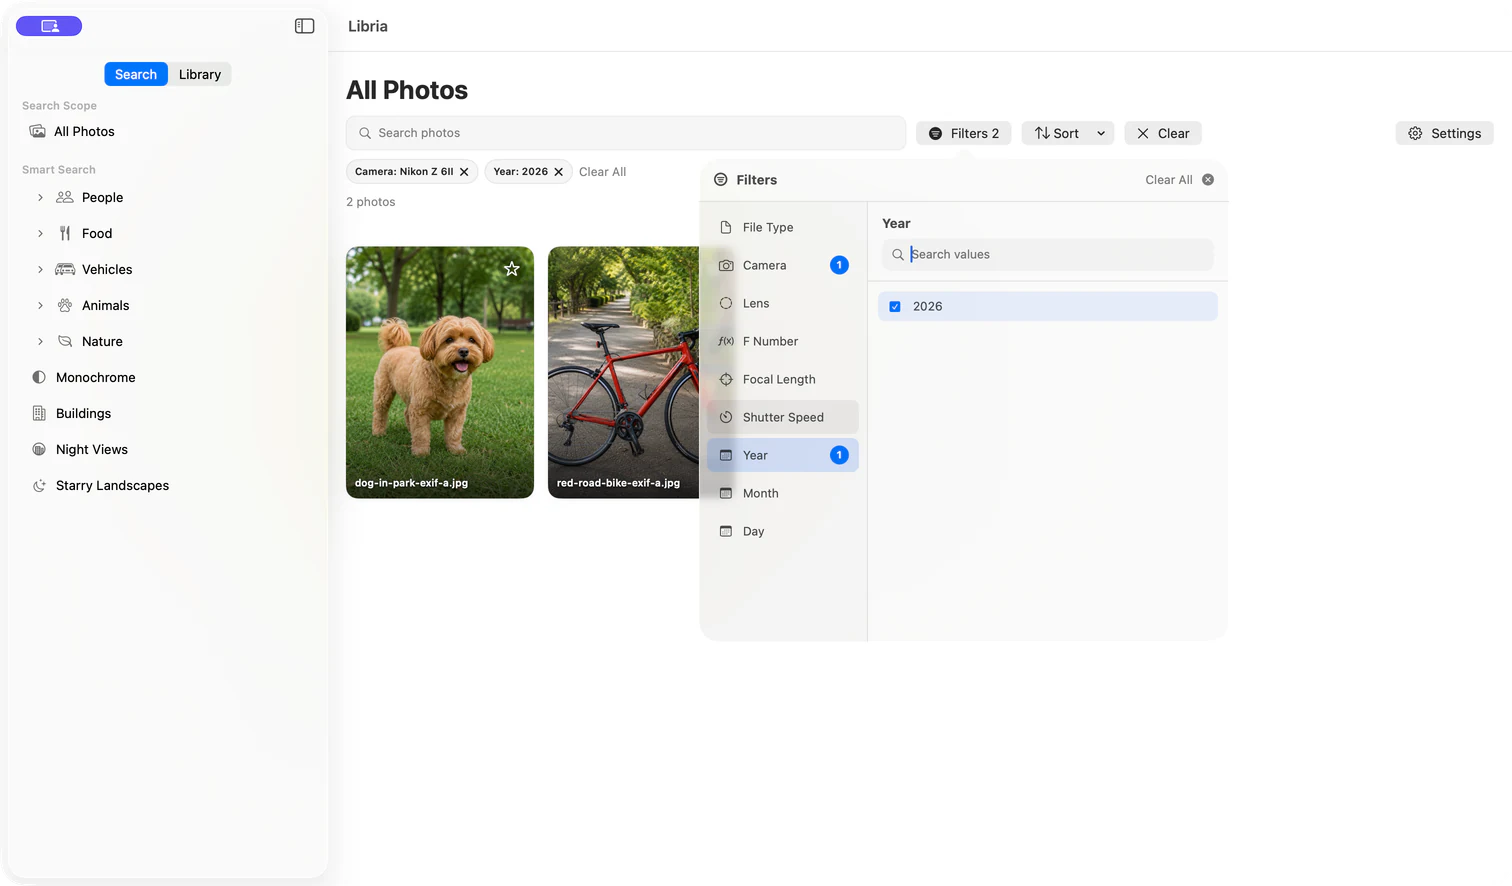
- Select Filters in the search toolbar.
- Select a category on the left.
- If the category has many values, enter part of a value in Search values. Typing here does not add a photo condition.
- Select a value. It applies immediately. Multiple values in the same category use OR.
- Select values in another category to require both categories. Different categories use AND.
- When finished, use the close control in the upper-right corner of the Filters panel.
F numbers appear as F4, and shutter speeds appear as 1/60s. Camera names combine the recorded manufacturer and model.
Enter a range
F Number, Focal Length, and Shutter Speed support Range.
- Open Range for the category.
- For F Number and Focal Length, enter Min and Max. For Shutter Speed, enter Shortest and Longest. Either side may be left empty.
- Enter shutter speed in a form such as 1/250.
- Select Apply.
17
Clear Search Conditions
Remove one condition
- Review the condition chips in the search toolbar.
- Use the remove control on the condition you no longer need.
Remove all filter conditions
- Open Filters.
- Select Clear All.
Clear the complete search
Select Clear Search in the empty-results screen or Clear in the toolbar.
18
View and Inspect Photos
Open photo details
- Single-click a photo in the grid to open its detail view.
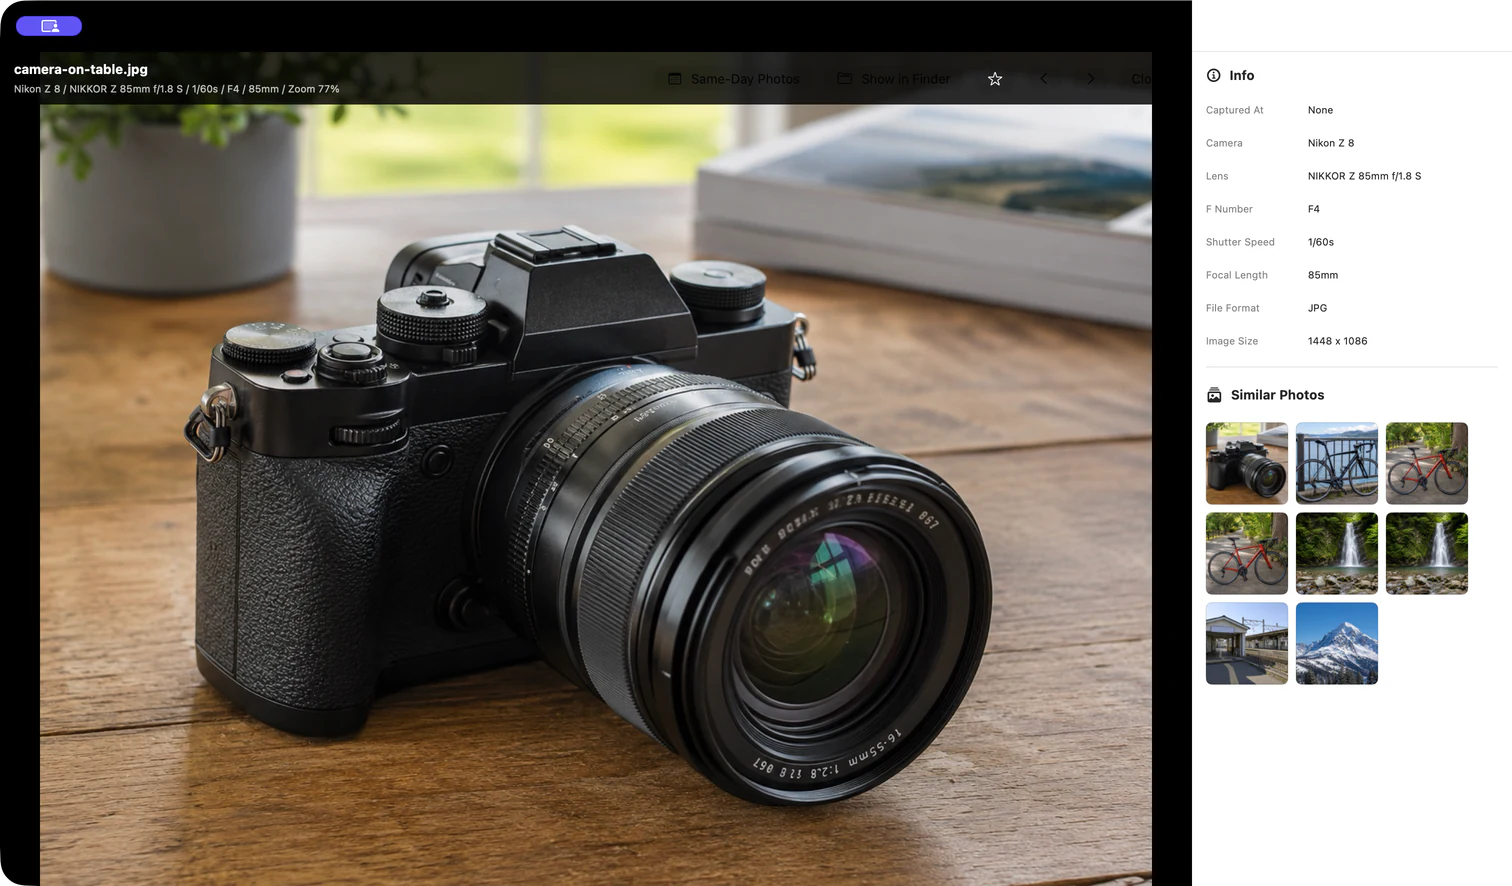
- Under Info, review details such as Captured At, Camera, Lens, F Number, Shutter Speed, Focal Length, File Format, and Image Size.
- With the photo focused, press + to zoom in. Drag the enlarged photo to pan.
- Use Previous and Next to move through the current photo list.
In the example shown in this guide, Captured At is None. The other details include Nikon Z 8, NIKKOR Z 85mm f/1.8 S, F4, 1/60s, 85mm, JPG, and 1448 x 1086.
Add or remove a favorite
Select the star on a photo card or in photo details. Open Favorites from the sidebar to view starred photos. Select the star again to remove a favorite.
When Favorites is empty, Libria shows 0 photos and No favorite photos yet.
View photos from the same day
For a photo with a capture date, Same-Day Photos applies Year, Month, and Day together.
Show the original file in Finder
Select Show in Finder. The action is unavailable if the original was moved or deleted, or if its storage location is disconnected.
View Similar Photos
Similar Photos appears automatically in the detail view. Opening a similar photo does not create a search-condition chip, and the suggestions may not always be complete or accurate.
Sort the photo grid
Open Sort and choose one of these options:
- Date Newest First
- Date Oldest First
- Filename A-Z
- Filename Z-A
19
Manage Registered Folders
Change a registered location
- Open Settings → Photo Folders.
- Select Change Location for the folder.
- Select the moved folder, or select the same folder again to refresh access.
- If needed, use Check for Changes or rescan from Library & Search.
Remove a folder registration
- Open Settings → Photo Folders.
- Select Remove Registration for the folder.
- When Remove this folder? appears, confirm the selected folder. If it is being scanned, Libria also stops work for that folder.
- Select Remove Registration.
20
Use External Drives and NAS Storage
You can register folders on external drives and NAS storage. Because Libria does not copy the originals to your Mac, their storage location must be available when Libria opens an original or refreshes its data.
Reconnect a storage location
- Connect the external drive to your Mac, or connect to the NAS share in Finder.
- Open Settings → Library & Search.
- Choose Recheck Folder Connections from Other Actions.
- To refresh a NAS folder, open Photo Folders and choose Rescan This Folder.
Saved thumbnails and metadata may remain available while storage is disconnected. Actions that need the original file, such as a larger preview or Show in Finder, may be unavailable. If Libria reports Original file is unavailable, reconnect the storage, then run Recheck Folder Connections.
21
Prepare AI Search
The first preparation creates AI search data from registered photos on your Mac. The time required varies with photo count, RAW usage, Mac performance, and where the originals are stored.
Check preparation status
- Open Settings.
- Select Library & Search.
- Review AI Search Data. When preparation is complete, it shows AI Search Available. In the 18-photo example shown here, the count is Searchable photos: 18 / 18.
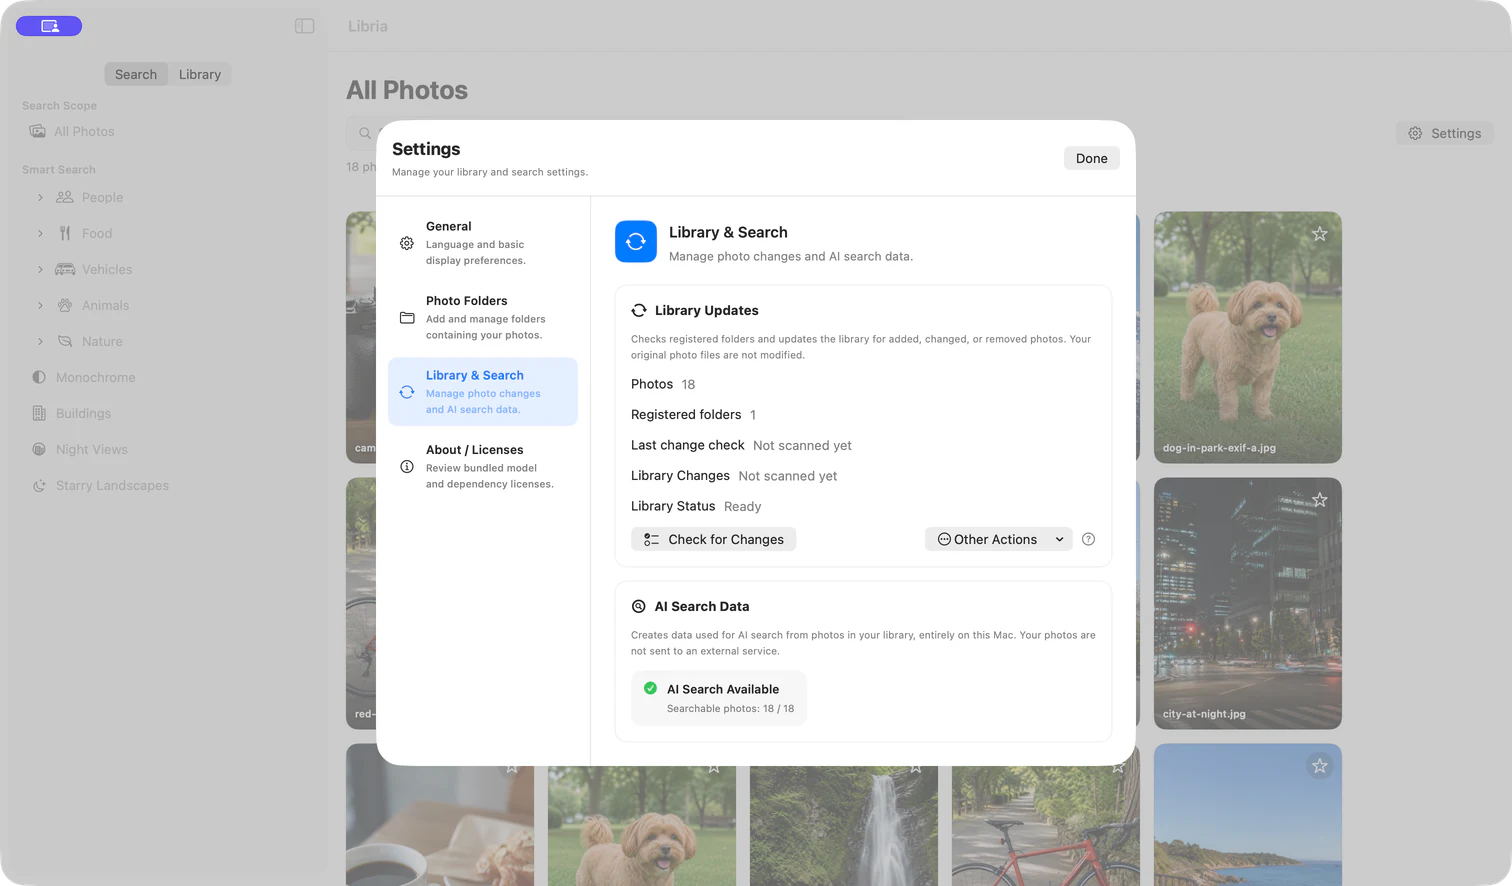
During preparation, pausing, retrying, or waiting for disconnected storage, Libria may show guidance appropriate to the current state. Check the storage connection and folder access, then follow the guidance shown in the app.
22
When Photos Cannot Be Found
Review missing photos
- Open Settings → Library & Search.
- Select Check for Changes.
- If missing photos are reported, select Review Missing Photos.
- Review Previous location, Registered source, Last seen, and Status.
After restoring the original files
- Return the original files to a registered folder.
- Reconnect the external drive or NAS if necessary.
- Select Check Again.
Remove stale library records
- Confirm the selected photos and count.
- Select Remove number Missing Photos.
- Read the confirmation and remove only the stale library records.
23
Restore Purchases
- Confirm that the Mac is online and uses the Mac App Store account associated with the purchase.
- Open Settings.
- Select About / Licenses → Purchase Information.
- Select Restore Purchases.
- Review the purchase status. An active Full Unlock is described as Purchased. Existing features remain available.
If the purchase is not restored, check the internet connection and Mac App Store account state, wait briefly, and try again.
24
Frequently Asked Questions
Do I need to move my photos into a Libria folder?
No. You can register the photo folders you already use. Libria leaves your originals where they are and creates thumbnails and search data locally on your Mac.
Does Libria change my original photos?
No. Libria does not modify photos in registered folders. Removing a folder registration or removing stale records for missing photos does not delete the original files.
Does the free trial start when I install Libria?
No. The initial screen offers Start Free Trial. You can also select Add Folder, choose Show Purchase Information in the license message, and then select Start 14-Day Trial on the Purchase Information screen. You may be asked to sign in to Apple Media Services when starting the trial.
Is Full Unlock a subscription?
No. Full Unlock is a one-time purchase with no monthly fee. Check the current price in the Mac App Store or on the Purchase Information screen.
Are my photos sent to an external AI service?
No. Photo recognition, AI search data, and search processing run on your Mac. Libria does not send your registered photo library to an external AI service for search.
Can I search while AI Search is being prepared?
You can continue browsing photos and using standard search. AI Search is available for photos whose AI search data is ready.
Can I register RAW photos?
Libria supports RAW formats that macOS can read. It may use an embedded preview or a same-name JPEG for display. Support for every RAW format is not guaranteed.
Do photos in a NAS folder update automatically?
No. Network folders do not update automatically. Connect to the NAS, then use Rescan This Folder or Check for Changes when you need to refresh the library.
Can I stop a scan that is in progress?
Yes. Select Stop Scan in the sidebar or in Settings → Library & Search → Library Updates. Work completed before the stop is saved safely, and you can run another scan when needed. Your original photo files are not changed.
Can I rebuild my library data from scratch?
Yes. Choose Rebuild Library Data… from Settings → Library & Search → Other Actions. Registered folders and original photos remain, while Libria’s library data—including favorites and tags—plus search, AI, face-analysis data, thumbnails, and caches are cleared and rebuilt from the registered folders.
Can Libria Connect reach my Mac over the internet?
No. Libria Connect is designed for use on the same local network as the Mac running Libria. It does not publish your photo library for internet access.
Are photos copied to my iPhone automatically?
No. Only originals you explicitly choose with Save Photos or Save Photo are added to the iPhone photo library.
25
Troubleshooting
No search results appear
Try a shorter or different search term, return the folder scope to All Photos, and remove filters with Clear All.
A photo folder cannot be added
Confirm that a Trial or Full Unlock is active, then select the folder that contains your photos. If access was lost, use Change Location to select the same folder again.
Photos on an external drive or NAS cannot be opened
Connect the drive to your Mac or connect to the network share in Finder, then run Recheck Folder Connections.
AI Search preparation is not progressing
Open Settings → Library & Search and review AI Search Data. If the originals are on external storage, check the connection and folder access, then follow the guidance shown in Libria.
Libria reports missing photos
Return the original files to a registered folder and use Check Again. If only stale library records remain, review the selected items before removing those records.
I want to rebuild the library display or search data
Choose Settings → Library & Search → Other Actions → Rebuild Library Data…. Registered folders and original photos remain, but Libria’s local data, including favorites and tags, is rebuilt.
Purchase information will not load or a purchase cannot be restored
Check the internet connection and the Mac App Store account in use. Wait briefly, then try Restore Purchases again.
Libria Connect cannot connect to the Mac
Confirm that the Mac and iPhone are on the same local network and that Libria is running. In Libria, open Settings → iOS LAN Connection and confirm that LAN Connection is enabled. Allow Local Network access on the iPhone, then try Connect again.
The QR code cannot be scanned or pairing fails
Do not reuse an old QR code. Select Add New Device again on the Mac to create a fresh invitation, then choose Scan QR Code on the iPhone and keep the complete code inside the camera frame.
A photo cannot be saved to the iPhone
Check permission to add photos, available iPhone storage, and whether the original is available on the Mac. If the connection was interrupted, check the Mac LAN connection and use Try Again when prompted.
26
Privacy and Local Processing
Photo recognition, standard search data, AI search data, and AI Search are processed on your Mac. Libria does not send your registered photo library to an external AI service for search.
Thumbnails, previews, photo information, search data, and AI analysis results are stored locally. Loading Mac App Store product information, purchasing Full Unlock, and restoring purchases may require a network connection.
Libria Connect communicates over TLS on the same local network. Credentials are stored in the iPhone Keychain, and search history is not persisted. Unpair removes the selected Mac’s credentials and that Mac’s thumbnail and preview caches from the iPhone.
27
Contact Support
If this guide does not resolve the issue, collect the following information before contacting support:
- Libria and Libria Connect versions and builds
- macOS and iOS versions
- Mac and iPhone models
- The action that led to the issue
- Any message shown
- Steps to reproduce the issue